
Documentation on this topic is pretty sparse, and so I thought I would put together a complete example to help you along the way!
My requirement was that I had to pull together an AI-based code summariser for code based in Azure DevOps repositories, and wanted to host a simple user interface for the rest of my team to use. Hosting an app in Azure DevOps itself is a good idea as it's a platform that the team use anyway and integrates nicely with the Azure DevOps API, and also gives me the ability to call out to a backend web API to do the AI workload.
Related: see this post here on how to host a backend API for a DevOps extension.
A note on libraries
Microsoft recommends the use of the azure-devops-extension-sdk library for developing extensions at this point in time.
However, I and many others have experienced problems with this library, specifically when trying to get contextual information such as the project name using getWebContext(). Therefore, this guide demonstrates how to develop an extension with the older vss-web-extension-sdk library instead.
If at the time you read this the new extension has been fixed - then go ahead and use that!
Note that the vss-web-extension-sdk library is marked as deprecated.
Basic Setup
- Create an empty directory to host your project and run
npm init - Install dev dependency on the TFX cli:
npm install tfx-cli --save-dev - Create a Vue app in a subdirectory, I'm using Nuxt to create my example using
npx nuxi@latest init sample-devops-extension
You will also need to create an account on the Visual Studio Marketplace in order to host your extension, but I won't cover that here. If you can get through this guide, that bit should be easy!
Install the VSS library
You will need the VSS library to host your extension - without it Azure DevOps will not load your extension.
The VSS library can't be imported as a module, and so instead we'll install it from a CDN. You could also download the script and package it in your project yourself.
I've done this at a global level in my project:
export default defineNuxtConfig({
  app: {
    head: {
      script: [
        {
          src: 'https://cdn.jsdelivr.net/npm/vss-web-extension-sdk@5.141.0/lib/VSS.SDK.min.js',
          type: 'text/javascript'
        }
      ]
    }
  }
})
Create the Extension Manifest
Create a file in the root of your directory called {your-extension-name}.json and add the following content to it. This file specifies the properties of your new extension, including its name, publisher, version number, icon image and required scopes.
In this example I've used the vso.code scope, meaning that a call to SDK.getAccessToken() will return a JWT for the current user with permission to read code from repositories using the Azure DevOps API. These permissions must be granted and agreed to by anyone installing your extension.
{
    "manifestVersion": 1,
    "id": "{your-app-id}",
    "publisher": "{your-publisher-name}",
    "version": "1.0.1",
    "name": "Sample Extension",
    "description": "{your-extension-description}",
    "public": false,
    "categories": ["Azure Repos"],
    "targets": [
        {
            "id": "Microsoft.VisualStudio.Services"
        }
    ],
    "contributions": [
        {
            "id": "{your-app-id}",
            "type": "ms.vss-web.hub",
            "targets": [
                "ms.vss-code-web.code-hub-group"
            ],
            "properties": {
                "name": "Sample Extension",
                "uri": "index.html"
            }
        }
    ],
    "files": [
        {
            "path": "sample-extension-app/.output/public",
            "addressable": true,
            "packagePath": "/"
        }
    ],
    "scopes": [
        "vso.code"
    ]
}
Interacting with Azure DevOps
In order for your web app to be loaded into Azure DevOps, you must call VSS.init(), and before you can interact with Azure DevOps you must wait for a call to VSS.ready() to complete, and pass it a callback function to be executed. Therefore, in your Vue app, do something like the following:
<script setup lang="ts">

const userName = ref('');
const projectName = ref('');

onMounted(async () => {
  VSS.init();

  await VSS.ready(async () => {
    const webContext = VSS.getWebContext();

    projectName.value = webContext.project.name;
    userName.value = webContext.user.name;
  });
});
</script>
Then you can write some markup to show the values on the screen:
<template>
  <p>Hello {{userName}}!</p>
  <p>Project name is {{projectName}}!</p>
</template>
Configure Vue App Build
It's your job to build out your amazing new Vue app, but I can show you how to configure the build such that it can be hosted as an Azure DevOps extension.
As this site will be hosted on a Microsoft CDN at an unknown URL and subdirectory, we need to make sure that when we generate the static build the files are generated with valid references to one another. Therefore, for Nuxt specifically, we need to make sure we set the cdnURL to . to make this happen. If you're using another framework, this will vary:
export default defineNuxtConfig({
  app: {
    cdnURL: '.'
  }
})
Next, let's get a build process sorted out.
Add the following script into your package.json
"scripts": {
    "build": "pushd sample-extension-app && npm run generate && popd && tfx extension create --rev-version --manifest-globs {your-extension-name}.json"
  }
Now you can use npm run build to go into your Vue app's directory, run the generate command to build a static site, then come back up one level and run tfx extension create. This will create a VSIX file that you can upload to the Visual Studio Marketplace.
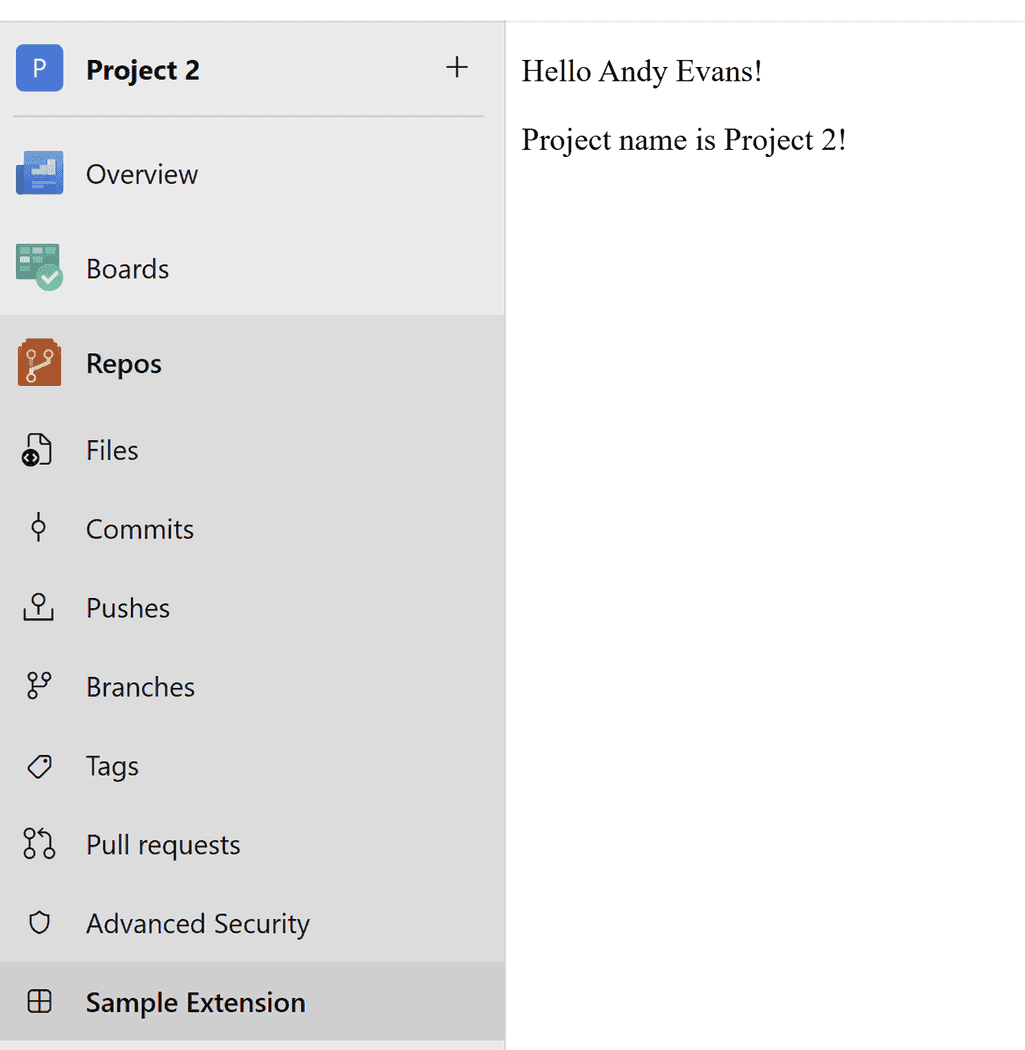
The Finished Article
Once installed, your Azure DevOps extension should look a little bit like this!
Check out the full example here.
See also: how to host a backend API for your DevOps extension.